Showing posts with label Trowel And Spoon. Show all posts

Tuesday, August 9, 2011

Francis Mallman's Chimichurri

Conde N'ast Traveler names Argentinian Chef Francis Mallman as one of Latin America's pre-eminent chefs. He owns a very chic restaurant in Garzon UY, in the same Maldonado department where we own property.

The NY Times declares that EL Garzon is one of 10 restaurants worth a plane ride. We didn't make it to his restaurant on our last trip and we don't customarily jump aboard a jet to have dinner. However, we do own his grilling bible, Seven Fires, Grilling The Argentine Way.
One of more memorable dining experiences in Uruguay was at the Estancia Del Puerto. Along with the superbly simple grilled meats, red pepper and provolone, we were served red and green sauces on the side. It was so good that I ate at least half a cup of the chimichurri by myself.

Recently, buying grass fed, pastured beef direct from the farm reminded us of the flavor of the great grills we had all over Uruguay. Of course, I wanted to replicate them so I pulled down our copy of Seven Fires from the kitchen shelf. Only, in my little coastal hometown, I need a permit to have an open fire if I want to bbq like the Argentines and Uruguayans. And we don't own a grill. Also, it is hotter than Dante's fourth circle of Hell in Florida this July. But Mallman's chimichurri sauce over a rare steak cooked in a cast iron skillet I can do. Be warned: a taste of this authentic sauce and you may have hallucinations of gauchos and tango.

Francis Mallmann’s Chimichurri

Photo credit: ecleticcook.com

1 cup water
1 tbs. coarse salt
1 head garlic, separated into cloves and peeled
1 cup packed fresh flat-leaf parsley leaves
1 cup fresh oregano leaves (I used 3-4 tbsp dried with good results)
2 tsp. crushed red- pepper flakes
1/4 cup red-wine vinegar
1/2 cup extra-virgin olive oil

Bring the water to a boil in a small saucepan. Add the salt, and stir until it dissolves. Remove from heat, and allow to cool. Mince the garlic very finely, and put in a medium bowl.

(1) Mince the parsley and oregano, and add to the garlic, along with the red-pepper flakes.

(2) Whisk in the red-wine vinegar, then the olive oil. Whisk in the salted water.

(3) Transfer to a jar with a tight-fitting lid, and keep in the refrigerator. Let the flavors mingle for at least a day, and serve with grilled meats. The sauce can be kept refrigerated for up to 3 weeks

Wednesday, October 20, 2010

Pasta Al Forno - David Rocco

The launch of The Cooking Channel renewed my interest in food tv. One of my favorite shows is hosted by David Rocco. The "Boot Camp" episode featured a recipe for Pasta Al Forno. It was so "delizioso".


A pound of pasta is unthinkable us...I reduced the pasta to 1/3 of a 1 lb box (I had penne in the pantry so that's what I used)... a medium eggplant and 2 med-large zucchini. It was surprisingly flavorful with the smoked cheese, olives and sundried tomatoes. I skipped the layering...added the smoke cheese to the sauce and used the mozzerella on top.

Sunday, October 10, 2010

Pumpkin Gingerbread

I came across the prettiest sugar pumpkin at our local produce stand. I put it in my eco-friendly shopping bag confident of finding a way to utilize it.

To make fresh pumpkin puree:

1. Wash, split in half vertically and scoop out the center.
2. Place in a roasting pan, cut side down, and pour in enough water to cover the edges of the pumpkin 1/4 inch.
3. Roast until you can easily pierce the flesh and skin with a fork.
4. Scoop out pulp and puree.

Pumpkin Gingerbread

Combine 2.5 tsp cinnamon and ginger, 3/4tsp nutmeg, 2 tsp baking powder, 1/2 tsp baking soda and 1/4 tea salt.

In a separate bowl, add 2 eggs and 1 egg white, 1/2 c almond or other oil and 1/2 c raw honey or molasses. If you want a very sweet cake, add 1/3 c brown sugar. If you are watching your sugar intake, omit it, as I did. To this mixture, stir in 1 cup fresh or canned pumpkin puree.

Optional: 1/2 c chopped walnuts or other nut and 1/4 c crystallized ginger, minced. Add to wet ingredients then fold in dry ingredients.


Pour into 9x9 pan that has been sprayed with nonstick cooking spray.

Bake at 350 F for 35-40 min, looking for the gingerbread to pull away from the sides of the pan and an inserted toothpick in the center comes out clean. Serve warm or cool on a rack.

Thursday, July 1, 2010

Tarts....Of The Tomato Kind

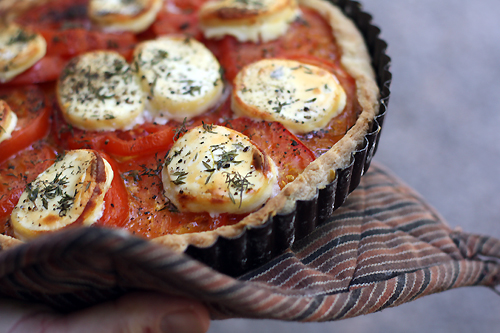
My tart pans that were given to me as a wedding gift have never before been used. It took seeing David Lebovitz's blog on a tomato tart to finally get me over my fear of tarts. . Along with having a proper pan, I had a bowl full of ripening tomatoes on the counter.

This wasn't one of those fancy, shiny tarts of perfection you peer at in European bakery windows. This was rustic vegetable and cheese fare for every day. I am happy to report that my first tart turned out perfectly, enhanced by garden fresh basil, pine nuts and an almond parmesan crust. It was a hit with an arugula salad for dinner and a egg for lunch the next day.

Best of all, when I posted a photo of my creation on David's FB page, he complimented me on adding cheese to the crust!


David Lebovitz - my French Tomato Tart inspiration.


Comfy Belly's Caramelized Onion, Tomato, Goat Cheese Tart recipe had the best gluten free savory crust I could find. Don't be put off by the flourless crust...it was delicious.


Almond flour, grated parmesan and a little salt and water. A crust with a low glycemic rating and protein is a better option for my nutritional needs. It was fantastic.

Ina Garten's Tomato Goat Cheese Tarts


Ina's builds her tarts on puff pastry, store bought and convenient.

Simply Recipes' Tomato Pie utilizes a pie shell for added convenience and a mouth watering cheese topping.


Ellie Kreiger's Cornmeal Crust


For those looking for a cornmeal crust...and more roasted vegetables.

Chez US has a Savory Tomato Tart that is a bit more elegant.


For special occasions or entertaining, the goat cheese custard of this tomato tart elevates it to celebration status.

I can immediately imagine a version with zucchini, feta and mint.

Sunday, June 20, 2010

Harvesting

Back in my Supercuts days, I was in a board meeting where the CEO was lamenting that franchisees were only interesting in "harvesting". I didn't see a problem with harvesting then and I don't see a problem with harvesting now. I am delighting in enjoying the fruits (or vegetables and herbs as it were) of my labor.


Green leaf lettuce

Tomatoes


Swiss Chard

The basil, oregano, rosemary, thyme and chives are finally happy. Veggies such as the cukes and eggplant have kicked the bucket so I planted seasonal color in their place.

I developed another raw salad this week:

Carrot Mint Slaw

4 carrots, freshly shredded (use bagged if you must)
3-6 sprigs of mint, leaves deflowered and snipped
2 or more ounces of feta cheese, crumbled
Lemon Honey Dressing

If serving in a bowl, stir ingredients together. If serving on a plate, layer ingredients then drizzle the dressing over the top. You can substitute the mint for italian parsley.


Lemon Honey Dressing

Juice 1 lemon and add honey measured to 1/2 of the amount of juice. Sprinkle with salt. Mix until honey melds with the lemon juice. Add almond (or other) oil about twice the amount of juice. Whisk until ingredients combine and slightly thicken. (If this is too stressful, go with 1/4 cup juice, 2 tablespoons of honey, 1/2 cup almond oil and 1/4 teaspoon of salt).

Wednesday, June 16, 2010

The Peach Misadventure

Having quite a few peaches ripening in a bowl on the counter, I was open to making them into a dessert. I scourged the net for a recipe. I found all kinds of tarts, pies, crisps, cobblers and such. Watching the new Cooking Channel's French Food At Home, I came across something I thought I could adapt. It was the recipe for Easy Pastry Shop Apple Tart. Don't ask how I got to a crustless Peach Ricotta Pie from there but one must give credit where it is due.


Now the original recipe called for things like butter, sugar, cream cheese and flour. These are things that I do not customarily consume for dessert. So I tinkered with it a little...and then a lot.

The first mishap was the crust. I tried replacing the flour with almond flour. The crust was a bubbly buttery goop. So I scraped in back into the bowl and added some flour. Next, I pressed it into a tart pan and baked again. It was a little to brown to weather another 40 min in the oven, so I put it down the sink.

Since I had made the "cream" filling, I decided to go crustless! Having switched out the cream cheese for blended ricotta (lower calories, more protein), I confidently poured my filling into a pie plate and added my peach mixture.

Did I mention I took the 1 and 1/3 cups of sugar and reduced it down to 6 tablespoons of xylitol?

The smell of peaches, vanilla and dairy gave me a sense of delight when I pulled out my improved concoction out of the oven. I let it cool...it was when slicing for servings that I knew my gig was up. A bit of liquid had separated into the bottom and the cheese and peaches did not hold together, pie-like. Frankly, it looked like I added peaches to scrambled eggs. Ordinarily, I might hide it under a heaping serving of whipped cream but we don't eat that either...and I'm currently out of a white frozen dessert made with coconut milk and agave nectar.

So I got busy in the kitchen because I saw this:


I would have been happy with something like this:


As you can see, things looked promising going in:


And, coming out:


Here's when I knew I was defeated:


So after wasted hours and wasted products (that almond flour and organic butter ain't cheap), I will serve my dessert because I have a sweetheart husband that eats anything I give him. However, I will use a trick from those French claufouti cooks...douse it in Amaretto.

Saturday, June 12, 2010

To Cook Or Not To Cook

With Vegas temperatures hitting the 100s recently, we crave foods that are cool and no cook. Here's a sample of some of the dishes I've served lately.


This Cabbage Carrot Salad contains shredded red cabbage, shredded carrots, chopped roasted almonds, sliced green onion, minced parsley and raisins. I made a vinaigrette of olive oil, lime juice, sherry vinegar and garlic with salt and pepper.


Simply chopped, ripened Peaches. Leftovers served over cottage cheese with nuts.

Chopped strawberries and avocado are delicious atop greens ( romaine and arugula here) along with roasted pecans. Cracked black pepper and a drizzle of almond oil and balsamic vinegar are all that is needed. Goat cheese would be a nice addition to a Strawberry Avocado Salad.


Potato salad updated...hariots verts are added to traditional ingredients of yukon potatoes, shallots and hard boiled eggs. Dressed with olive oil, mayonnaise, dijon, whole grain mustard and salt with pepper to make Potato Green Bean Salad.


Taking a cue from the Spaniards...roasted bell peppers, olive oil and sea salt served room temp. If you want to get fancy, add capers and some chippings of Manchego, Parmesan or Romano cheese. If you want to get more rustic, leave peppers mostly in tack after roasting and cleaning.

Saturday, May 1, 2010

Yogurt-Flaxseed Muffins

Our first weekend home in a couple of weeks warranted something a little more special than a bowl of oatmeal. I updated a go-to muffin recipe to meet current goals for clean eating. Doug and I agreed that these are better than the original!
I served mine with eggs baked with pureed grape tomatoes, basil and parm-reg cheese.


Yogurt-Flaxseed Muffins

Makes 12 muffins


1 stick (1/2 cup) unsalted butter, softened or 1/2 cup coconut oil
1/4 cup coconut or light brown sugar
1 large egg
1 cup greek style yogurt
1/4 cup agave nectar
1/2 cup dried fruit
1 cup all-purpose flour or gluten free baking mix
1 teaspoon baking soda
1/4 teaspoon salt
1 cup ground flaxseed or flaxseed meal

1/2 cup nuts (optional)
1/4 teaspoon cinnamon (optional)

In a large bowl with an electric mixer cream together the butter or oil and the coconut sugar until mixed, beat in the egg, the yogurt, and the agave nectar, and stir in dried fruit. In a bowl whisk together the flour/baking mix, baking soda, salt, cinnamon - nuts(optional) and the flaxseed. Combine dry mixture to the wet mixture, and stir the batter until it is just combined. Spoon the batter into muffin tin sprayed with oil, filling 3/4 and bake the muffins in the middle of a preheated 400°F. oven for 15 to 20 minutes, or until they are golden brown and springy to the touch. Turn the muffins out onto a rack and let them cool.

These muffins barely rise and are a bit humble looking. However, they are quite moist and filling. A tasty way to ingest your healthy omegas and fiber.

Updated recipe from Gourmet's Sour Cream Bran Muffin.

Sunday, February 21, 2010

Soil Bag Planting

I am experimenting with two methods for my suburban garden in Las Vegas: container and soil bag. Soil bag gardens are as simple as they come.


How to plant in a potting soil bag
:


1. Determine the bottom side of your bag. Punch drain holes into the bag then flip it over.

2. Cut an opening into the soil bag, leaving high enough sides to retain the soil.

3. Break up and even out the soil.

4. Transplant nursery plants into the soil bag. I used the Square Foot Garden method to determine plant spacing. Finish your project with watering.

I used a smaller square method for my Japanese eggplant and yellow squash. Mainly I wanted to try it...this is recommended for planting tomato plants. In the side slits, I planted garlic cloves pointed side up. You can use the slit variation for lettuces also.

I used 2 c. ft bags of GroWell Soil, which is a special mixture of 1/3 compost, 1/3 peat moss, and 1/3 coarse vermiculite (no dirt needed) known as Mel's Mix. Take this composition to your nursery and ask for the potting soil that most resembles it.

Their biggest detractor as far as I can see is the ugliness of the bags. As the plants grow, the bags will be less visible. My cousin, Katherine, uses hers to plant under trees where the root system doesn't let her dig and covers them with mulch. If the bags put you off, you can always invest in some grow bags. A solution Doug came up with was to build a frame for them, shown above. Here's another example of an attractive, sturdy box for the bags.

I have arranged my bags in a sunny spot close to my water source. Care for plants is a bit easier than row gardening. Because of the drainage, you are less likely to over water. If using Mel's Mix or something similar, no need to fertilize. Otherwise fertilize once a month.

I have green leaf and romaine lettuces, arugula, swiss chard, cabbage, broccoli, zucchini, eggplant, garlic and squash planted in my bags. With a bit of luck, I will have a delicious harvest to take to the kitchen. With a trip to the nursery for plants and soil and a few hours of planting, you could have your own harvest, too.

Saturday, February 20, 2010

Not Your Nana's Container Garden

My dad is a row gardener. He plants over a half acre each growing season and I am in awe and overwhelmed when I tour his garden. I admire his self sufficiency and envy the year round bounty of healthy produce.

As a novice, the expertise and back breaking work of row gardening has held me back. With the resurgence of victory, urban and suburban gardens, the science of what one can grow on a window sill, patio and tiny backyard makes it easier than ever for anyone to enter into the gardening foray.

Container and no dig gardening appeals to me. Once you have acquired your plants, soil and containers, your garden can be planted in a few hours.

Last year, I planted a container garden. I had a lot of success with my herbs. The tomatoes and peppers did great until the blackbirds noshed on them just before time to harvest. We were in the middle of installing a raised bed garden when we relocated so I have no idea about how that might have turned out.

This year, I reestablished my containers and am trying my hand at planting directly in soil bags. In my research, I have been astounded at the ingenuity others exhibit growing gardens for very little investment in very little space. If a garden can thrive on a Chicago rooftop or in soda bottles on a dorm balcony, surely the rest of us can find a way to grow nourishing foods for ourselves, neighbors and community.

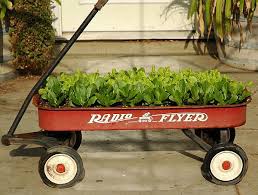
Take a look at some of the creativity of container and no dig gardens...


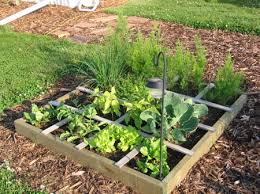
Square Foot Box Raised Bed


Plastic Swimming Pool


Soil Bag


Whole Foods Bag


Plastic Bottle


Straw Bale


Re-purposed Containers